
Unpacking Your Salt Spray Chamber
Associates Environmental Systems MX series salt spray chambers are constructed from clear lucite sheeting. While lucite is quite durable, it can be damaged during shipping. Even small cracks will spread over time, so be sure to contact AES immediately if you find any signs of shipping damage.
Make sure to inspect the chambers for cracks that may have occurred during shipping.
Place your MX chamber on a hard, level surface in an area with plenty of ventilation. Salt spray chambers are designed to create a corrosive atmosphere, so keep the chamber in a room with enough space and ventilation to minimize rusting in the surrounding test area (more on ventilation below).
Power & Utility Requirements
Power - The chamber and the electric panels are completely wired for use. The power source must be properly grounded the standard power requirements are listed on page 3-1 of your chamber’s user manual.
Water - The chamber requires a single distilled (demineralized) water. Untreated tap water should always be fed through a demineralized cartridge before use. You can learn more about AES water demineralizer systems by clicking here. Demineralizer systems can be purchased directly from the AES sales team and parts department.
Salt Spray Nozzle Assembly
All AES salt spray chambers are shipped with an atomizing nozzle installed. If you need to replace the nozzle, follow these steps:
- Apply a quarter-inch wide strip of Teflon tape to all joints. Take care to avoid allowing any tape to enter the inside of the pipe. It is recommended that the tape be applied two or three threads back from the end of the pipe.
- Take care to keep all foreign materials from entering the pipe and screw the short acrylic quarter-inch pipe nipple into the tapped hole on the inside of the chamber. Hand tightening is all that is required.
- Screw the salt spray nozzle to the acrylic nipple installed in Step 2 and tighten by hand. Turn the nozzle so the spray direction is toward the front of the chamber and the other tapped hole in the nozzle points down.
- Screw the long acrylic, quarter-inch threaded pipe into the tapped hole at the bottom of the nozzle until it is snug. This pipe is called the siphon tube
- Place the nylon mesh strainer over the other end of the siphon tube, and hold it in place with rubber bands. If the special MIL-STD-202 or MIL-STD-810 filter is used, attach it to the end of the siphon tube.
- Place the salt reservoir cover on the top of the salt reservoir.
Salt Spray Chamber Ventilation:
MX Series chambers need to be exhausted in order to prevent back pressure within the chamber. When setting up the chamber, make sure to install a non-corrosive, 3/4-inch pipe from the chamber exhaust to a point outside the building. The outdoor end of the exhaust pipe should be shielded to avoid the effects of air currents or winds.
The pipe should be kept as short as possible, as straight as possible, should slope continuously down from the chamber, and should have no liquid traps. The flexible hose should be avoided unless care is taken to ensure that it does not sag between the supports and create a liquid trap.
For exhaust lengths of more than 10 feet, a two-inch line should be used. If you need to pipe the exhaust to the roof, or for any other reason it's necessary to pipe upward from the chamber exhaust, use a T-fitting instead of an elbow. Orient the T so an 18-inch drop line and drain can be added to ensure that the exhaust line remains clear at all times.
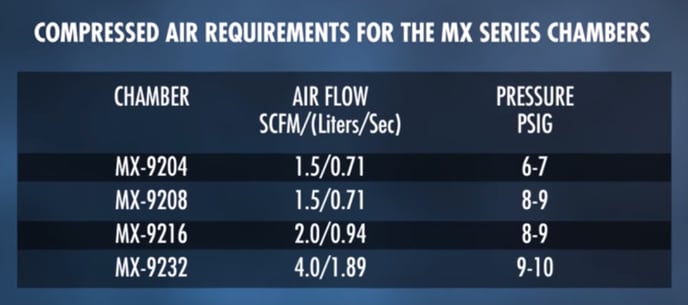
Salt Spray Chamber Air Supply
MX Series chambers need clean, oil-free compressed air. The chamber has been furnished with the valve marked air at the rear end of the chamber. The compressed air requirements for the MX series are as follows:
That wraps up the installation. You are now ready to begin operation. If you have any other questions, feel free to contact an AES representative directly.
|
Need additional information? Try Live chat or call us at: |
You can also fill out a Customer Support Request: |